Recipes

Healthy Recipes

Avocado Mousse (Vegan, Gluten Free)

Dear Leah Renee, 

I’ve heard about avocado’s being used in smoothies and in place of butter in recipes, so are there some good desserts to be made with them too?  ~Nikki, PA 

Yes!  Avocados can be used to make guacamole, spice up a sandwiches, thrown into a smoothie for a creamy finish and dose of healthy fats, and in place of unhealthy or processed ingredients in recipes.  But here, they hold their own and carry the dessert recipe all by itself.  

Avocado mousse.  Yes, you can actually enjoy chocolate mousse minus refined sugars, cream, and dairy products.  

You will need these items: 

  • ingredients avo mousse1 ripe avocado
  • 1/4 cup pure cocoa powder
  • 1/4 cup unsweetened vanilla almond milk*
  • 2 TB date paste (soaked dates & blended into a paste)
  • 2 TB pure maple syrup
  • 1 tsp vanilla extract
  • 1/4 tsp salt
  • Any toppings (if) you want!  I used slivered almonds for some crunch and garnished with a strawberry.  

*if your almond milk is not the unsweetened variety, you can cut back on the syrup.  A little taste test will let you know!  A packet of stevia can also be used in place of the date paste and/or maple syrup. Please feel free to experiment with any other sweeteners you prefer (honey, brown rice syrup, coconut sugar…)

Toss everything in a bowl, a food processor, or high speed blender:

ingredients in bowl


I used an electric hand mixer in a bowl since there weren’t that many ingredients.  Using a rubber spatula, I scraped the bowl clean and filled my glass with the decadent, yet healthy, avocado mousse I just made: 


choc avo mousse complete

What are your favorite avocado recipes?


Savory Carrot Muffins (Gluten Free, Low Carb, Refined Sugar Free)

Dear Leah Renee, 

I like to buy large bags of carrots but usually end up throwing a couple away at the end of their lifespan…any ideas what to do with the extra?  Thanks. ~Tamara, IL

The question of what to do with leftover carrots comes up a lot!  I too seem to have an abundance of them!  This recipe will help you (tastily!) use some up.  I know you’ve already made these carrot crackers I posted a while back, and this soothing carrot ginger miso soup, it’s time for something new.  If carrot cake had a healthier sibling, it would be this savory carrot muffin.  If you don’t have a big sweet tooth and want something that’s going to be a good breakfast muffin or mid-afternoon snack, you’ve found your match.

ingredients, carrot muffins

Ingredients (organic when possible): 

  • 1 cup coconut flour
  • 1 cup shredded carrots
  • 1/2 cup raisins
  • 1/2 cup chopped walnuts
  • 1/2 cup ground flaxseeds
  • 1/4 cup raw honey or pure maple syrup
  • 2 tsp pure vanilla extract
  • 4 eggs
  • 1 tsp cinnamon
  • 2 tsp baking powder
  • 6 TB coconut or grapeseed oil
  • 1/2 cup almond milk

mixing ingredients together


carrot muffins stirred well

What to do: 

Preheat oven to 350F.  Mix all the ingredients together well in a large bowl.  When all the ingredients are nicely mixed together, pour or place ingredients in to a greased muffin tin.  I used a mini-muffin tin so I got double the amount (well, not really, but it felt that way!).  Bake for 20 minutes. Let it cool, just a little bit, before enjoying!

muffins to go into oven

Yours will be larger if you use a regular muffin tin!  They will raise more too–I accidentally left out the baking powder!!!  I never said I was perfect 😉


carrot muffin, mini


How do you use up your leftover carrots?!  What’s your favorite carrot recipe?

Chocolate Bliss Balls Recipe (Raw, Vegan, Gluten Free)

Dear Leah Renee, 

What’s a simple dessert ball recipe?  I’m not a baker by any means, so if you have something that requires minimal effort and is quick, it would be appreciated!  ~Debbie, WA

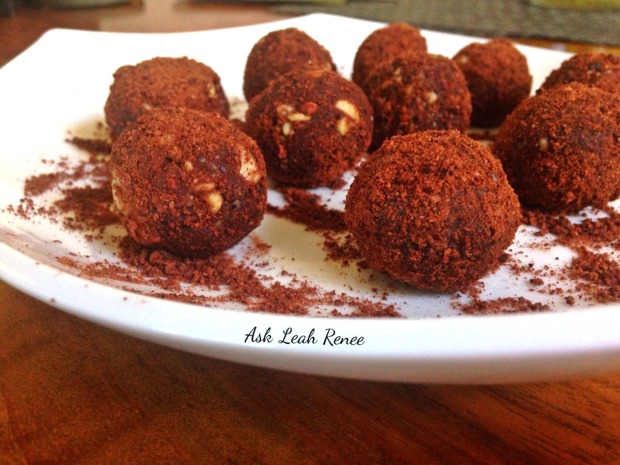
I like easy recipes, and this one fits the bill.  If you’re craving something sweet (and have already made the black bean brownies and raw cookie dough bites a million times now), here’s another one to add to your recipe book.  Full of chocolatey goodness, it’s not so bad for you either.  Certainly better than putting away a bar of commercial chocolate!  It’s got protein, fiber, and antioxidants.  The best part: it’s no-bake and simple to make.

Here’s what you’ll need (honey is optional if you like it extra sweet):

Bliss balls ingredients

Take 1/2 cup cashews, 6 soaked dates (just soak them in almond milk or water for a couple hours, or use un-soaked if that’s all that’s available), and cacao powder in a food processor or blender.  I used my Vitamix, but I’d rather have used a food processor since it’s more difficult to scoop out! Blend until smooth, or in my case, a little chunky, either one is fine!  Exhibit A:

bliss balls in vitamix


Transfer to a bowl (have a little taste and see if the sweetness is to your liking. If you like it sweeter, add a TB of raw honey): 

bliss ball dough

And roll into balls (that’s the fun part):

chocolate bliss balls

You can enjoy them this way, or roll them in cacao nibs (I ground mine finer), goji berries, maca powder, coconut flakes…whatever you like!  But, I like chocolate, so the opportunity to add more won 🙂

Bliss Balls

Share with others, or consume them all yourself (not all at once, of course) 😉


What’s your favorite healthy(er) dessert?


Antioxidant Summer Salsa

Dear Leah Renee, 
I usually purchase all my condiments because I’m kind of intimidated to do it myself. Salsa doesn’t seems too hard but I don’t know where to start.  Do you have a recipe you like?  Thanks! ~Lilly, MI
I just love making my own condiments at home.  We don’t always have time, the ingredients on hand, or the no-how, but with just a little planning and preparation you can make your own in no time! You’re right, homemade salsa is pretty easy, especially pico de gallo.  What makes it taste the best is the quality and ripeness of the tomatoes you use.  Depending on the season you’ll find the sweetness of the salsa will vary.
Tomato varieties
For this recipe, I used better boy tomatoes.  My personal favorite are heirloom tomatoes (you can use beefsteak red heirlooms for this recipe), but those are not always available.  Roma are a good option too.  Always organic when possible!
Chopping pico de gallo
Here’s what else you’ll need including those yummy tomatoes, pico de gallo ingredients:  
  • 2 medium tomatoes, diced
  • 1 red onion, finely chopped
  • 1/2 fresh jalapeno pepper, seeded and finely chopped
  • 1/4 cup chopped fresh cilantro
  • 2 tsp white wine vinegar
  • 1/2 tsp garlic powder
  • 1/2 tsp onion powder
  • 1/4 tsp sea salt
  • pepper to taste
  • squeeze of fresh lime

pico de gallo in progress

Directions: 

In a medium bowl, combine all your chopped and diced ingredients.  Add garlic and onion powder followed by salt, pepper, and squeeze of lime.  With a spoon, stir until all ingredients are nicely mixed together.

Note:

  • When chopping tomatoes, all juices that naturally get onto the cutting board are to be poured in with the tomatoes themselves.  This gives the pico de gallo extra flavor and heartiness.
  • This recipe can be served chilled or left out for a while at room temperature.  Tomatoes provide the most beneficial antioxidant, lycopene, at room temperature or cooked.

pico de gallo salsa finished

Serve with homemade tortilla chips and you’re good to go!

Sweet-Curbing Antioxidant Rich Drink

Dear Leah Renee, 

I get a sweet tooth at night and more than anything want something comforting and yummy.  I usually go for a piece of candy or chocolate.  Any suggestions? ~Fiona, Aus.

Me too!  I’ve seen and heard of many ways to curb a craving.  Go take a walk, breathe, have a glass of water, eat something bitter, have one of those food-like products that’s ‘sugar free’ or ‘fat free’ so you’re not having a ton of sugar or fat (not a fan!).  But really?  Late at night?  I highly doubt you’re going to jump out from under your blanket on the couch to go for a stroll (in which case you may just land at the local fro-yo shop anyway), nor are you going to pound back a glass of water for fear of getting up every hour of the night.  And lets not even entertain those other products!

My suggestion is one that I have and happen to personally love.  Here it is: 

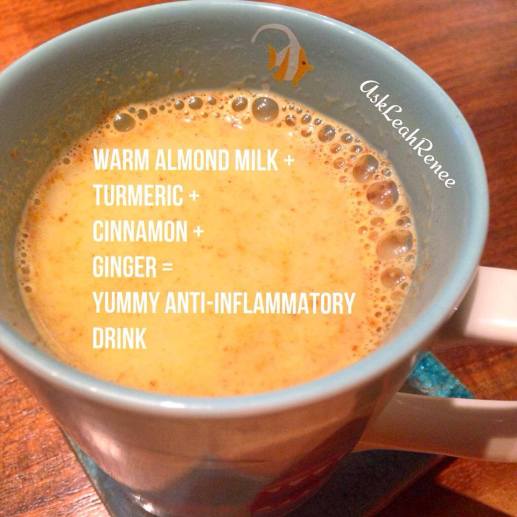
almond milk turmeric drink


All you need is a few simple ingredients: 

  • 1 cup Unsweetened Vanilla Almond Milk
  • 1 TB Ginger juice (if you don’t have a fresh batch of this handy, you can use some powdered ginger)
  • 1/4 tsp ground turmeric
  • 1/4 tsp ground cinnamon

In a small saucepan on medium heat, warm up the unsweetened vanilla almond milk for 3-5 minutes.  Add the rest of the ingredients and stir.  You don’t want to bring it to a boil in order to keep all the powers from the ginger juice, turmeric, and cinnamon.

If you’re not already adding some turmeric to your regimen, this is a great way to start!  Turmeric is a powerful spice full of anti-inflammatory and antioxidant compounds.  It contains curcumin, a phytonutrient which can rival prescription medications in its ability to reduce inflammation in the body.  The cinnamon helps to alleviate blood sugar spikes and will keep you feeling calm and restful through the night!

Enjoy!

What’s your favorite way to curb a sweet tooth?

Why Sprouted Almonds Are Best

Dear Leah Renee, 

Why are sprouted almonds any better than raw or roasted?  ~Liisa, CA 

almonds

Almonds are tasty, versatile, and provide many nutritional benefits.  They can be enjoyed many ways, not all of which are nutritious depending on if they’re salted or unsalted, roasted, sprouted, candied, or spiced.  A friend of mine makes a bowl of “spiced” nuts for parties soaked in bacon fat and roasted.  I’m not going to lie—they’re UNREAL (and I don’t even eat bacon, nor did I know at the time that’s how they were made), but this is certainly not the nutritional way to consume them!

In general, here are some reasons why almonds are superstars:

  • Promotes heart health (lots of Vitamin E)
  • Promotes a healthy weight
  • Rich in bone-building minerals like magnesium, manganese & copper
  • Healthy amino acid content
  • High in B2 (Riboflavin) for energy
  • Good source of fiber

Roasting almonds will add flavor, some disadvantages are added oils, high in sodium (if salted), high in additional fats, sugars, and are more difficult to digest.  When almonds are processed, we lose much of their nutritional value.  A more beneficial method is dry roasting, which excludes the use of any oil which in turn would leave out the salt too, and contain less fat.

Raw almonds are not (usually) actually raw.  They’re not coming straight from the tree and into your local supermarket.  Most almonds from California (which consist of about 80% of our supply) are pasteurized to kill off any potentially harmful bacteria that may have come in contact with them (such as salmonella).  But, because they’re not roasted, they can still be labeled as ‘raw’ even after pasteurization.  Frustrating!!!

Soaking almonds even for just a few short hours will allow the phytic acid (which inhibits your body’s ability to fully assimilate all the wonderful nutrients it contains—see more below) to start breaking down. Your body will get to use a greater amount of the nutrients from soaked nuts than regular raw nuts. You can keep them in a container of water in the fridge.

Almonds sprouting in dehydrator

Sprouted almonds are the best, most nutritional way to enjoy them.   Almonds naturally contain something called phytic acid.  Phytic acid (or phytate) plays a role in mineral absorption—the role of the bad guy.  It has the ability to bind to the minerals which means less benefit to us.  It acts as an enzyme inhibitor and the best ways to get rid of that are soaking or sprouting.  Sprouting almonds is even better, nutritionally, than soaking. Sprouting makes the lipase, the enzyme which helps break down body fat, available for digestion.  We want to keep the enzymes intact so we can reap all the health advantages.

To make sprouted almonds, soak them (raw) for a few hours in filtered water, drain, and then transfer them to either a food dehydrator or in the oven at no more than 118 degrees (F) until they’re completely dry (at least 8 hours).  If they’re not completely dry they can go rancid after only a couple days.   Sprouted almonds are soooo much tastier than the traditional raw almonds. I promise you’ll notice the difference!

If you would like to purchase almonds already sprouted (and organic whenever possible!), you can find them in the bulk section at Whole Foods and other select health markets.  They’re also available online here and here.  If you do a search online you may find more depending on your area/country!

One of my favorite recipes are Almond Date Balls!  Here’s the recipe (adapted from The World’s Healthiest Foods):

Ingredients: 

  • 1 cup raw almonds (sprouted or soaked first)
  • 1/2 cup pitted dates
  • 1 TB water
  • 1 1/2 tsp cinnamon
  • 1/2 tsp almond extract
  • 1/8 tsp sea salt
  • optional: coconut flakes

Directions: 

1.  Using a food processor, Vitamix, or other high speed blender, process almonds until they’re in small pieces.  Remove half of them and set aside.

2.  Add dates to remaining almonds and process until the mixture turns into a fine meal.

3.  Add remaining ingredients and process until the mixture starts sticking together.  You’ll probably need to use a rubber spatula and scrape the bowl.

4.  By hand, mix date mixture with the reserved almond pieces.

5.  Form into 1-inch balls from the dough.  Store in the fridge for up to a week!  Enjoy!

protein ball pic


Mary’s Gone Crackers: Product Review

There are few brands I really trust to deliver.  Taste, texture, flavor, non-GMO, nutrient dense, easy-on-the-go, gluten free, low sodium, low in sugar, not too many calories, certified organic; these are all elements I look for when choosing a packaged product in the grocery store.  With that many expectations, that doesn’t leave too many options.  One of the brands I came to love many years ago, and still do, meets all of these requirements.  Mary’s Gone Crackers is the name, and great snacks are their game.  They know how to bring it, and I’m so happy to review some of their products.

Here are the 3 Mary’s Gone Crackers products I will highlight:

The Super Seed Crackers are delish!  I could eat the whole box.  Must ration.  The reasons why they’re awesome:  they contain whole grains, they’re gluten free, dairy-free, organic, and non-GMO.   What I love most about these is the combination of whole grains and other wholesome, nutritionally dense ingredients used: brown rice, quinoa, pumpkin seeds, sunflower seeds, flax seeds, poppy seeds, and seaweed!  There are so many ways to enjoy them (besides just straight out of the box!).  Here are some ideas:

Image

ImageDid I eat them all?  Yes.  Variety is good!  🙂 I know you’ll enjoy them too.

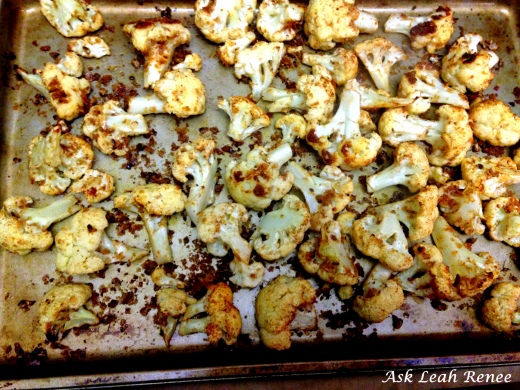
“Just The Crumbs” was a brilliant idea!  After years of enjoying their crackers, I couldn’t help but notice the amount of little crumbs that got left behind in the bottom of the bag!  They came up with a great solution and put them in an easy-to-use container.  This is perfect for everyone, but especially those always on the look-out for a gluten free bread crumb alternative.  I enjoyed these two ways, one was breaded cauliflower bites, and the other was meatballs!

Image

Why no pic on a plate, you ask?  They didn’t make it.  I guess they’re also referred to “cauliflower poppers” for a reason.  I just kept popping them into my mouth.

Here’s the easy recipe:  

  • 1 organic cauliflower floret
  • 1/4 cup coconut oil
  • 1/4 cup Just The Crumbs
  • 1 tsp paprika
  • 1 tsp sea salt
  • pepper to taste

Directions: 

Preheat oven to 425 degrees (F).  Grease a large baking sheet.  Cut the cauliflower into pieces so some of the stalk is still in tact (see photo above).  Add to a medium size bowl, pour the rest of the ingredients on top and mix well so the cauliflower is coated.  Pour onto baking sheet, make sure it’s spread evenly so they’re not overlapping.  Roast them for 35-40 min, or until golden brown.  Enjoy.

Here are the yummy meatballs I made using “Just The Crumbs”.  , recipe to come:

Image

Meatballs: 

  • 1 lb. organic grass-fed beef
  • 1/4 c Just The Crumbs
  • 1 egg
  • 1 tsp Italian spices (a blend of thyme, marjoram, rosemary, basil, oregano)
  • 1 tsp onion powder
  • 1 tsp garlic powder or minced garlic
  • 1 tsp salt
  • 1 tsp pepper
  • 1/4 cup of parmesan or pecorino grated cheese (optional)

Image

Directions:

Preheat oven to 375 degrees (F).  In a large mixing bowl, place the ground beef in and mix other ingredients on top.  Mix, lightly (with a large wooden spoon), so they’re blended together nicely, but not over doing it.  Using your hand or an ice cream scooper, form into balls and place on a greased, or lined, baking sheet.  Bake for 15 minutes on one side, take out and rotate to other side, bake another 15-20 minutes, until nicely browned.  Eat them on their own, dip in marinara, or add to a dish of your choice!

 You’ve now had your appetizers and your main, it’s time for a little dessert!  Let me introduce you to Chocolate Chip Love Cookies.  They’re gluten free, nut free, and dairy free!  They’re not flavor free.  Need I say more?  Here they are:

cookie marys

Have you already tried Mary’s Gone Crackers products?  How do you enjoy them?!  I’d love to hear from you!  🙂

Baked Parsnip Fries

Dear Leah Renee, 

When I have cravings, I want something salty without all the junk in it like store bought potato chips or french fries from a fast food restaurant.  Do you have any recipes to keep me from going to the drive thru?  Thanks!  ~Liz, GA

Who doesn’t love french fries?  I don’t know if it’s the taste, the texture, the saltiness, or the carb-o-liscious comfort, but all I know is they’re hard to resist!  I’m a fan of balance, so fries every now and again didn’t hurt anyone.  I am also a fan of creating some of my most desired indulgences into something healthier that gives me the same pleasure minus all the harmful ingredients.  Simply switching the cooking method to baked instead of fried helps rid all the extra fats and unhealthy chemicals that come from deep frying.

Here is what you need to make yourself and loved ones some tasty parsnip fries:

Ingredients:
  • 2 pounds parsnips, peeled and cut into evenly sized french fry sticks
  • 2 tablespoons high-heat oil (coconut oil, grapeseed oil, avocado oil)
  • 2 tablespoons seasoning of your choice (I combined onion & garlic powder, an Italian herb blend, and some paprika)
  • 1 teaspoon sea salt

herb mix for parnip fries

Instructions:
  1. Preheat oven to 425F.
  2. Combine all the ingredients in a medium or large size bowl and mix it around! You may have to heat the coconut oil first so it liquefies.
  3. Line two baking sheets with tinfoil and/or grease the baking sheet with some coconut oil or cooking spray.
  4. Trim ends of parsnips, peel, and cut into evenly sized french fry pieces (I cut them in half length-wise first).

parsnip1

Warning: After letting these guys cool a bit do everything in your power to not eat all of them (well, only if you have to share). 🙂

Bon Appetite!

parsnip fries


Warming, Immune-Boosting Carrot Ginger Miso Soup

I’m not typically a big soup-loving kinda girl.  It’s good, but for some reason I prefer chewing my food (it’s important to ‘chew’ your soups and smoothies–but you know what I mean!).  Every once in a while, there do come those occasional instances when nothing sounds better than a warm bowl of soup.  Thanks to a good quality blender I can usually whip it up in a snap!  Soups are often on the ‘scary list’ when dining out if you have any kind of food intolerance or allergy (or are veg/vegan since there are often animal sources used in soups like chicken broth) which is why making them at home is even better.  You know everything that’s going in there and hand-picked the ingredients yourself.

Tonight the feeling struck and I remembered I had huge bag of carrots in the fridge.  Since I always have miso and ginger stocked, I decided to combine all three for one tasty, immune boosting, antioxidant-filled soup!

CARROT GINGER SOUP

I’m excited to fill you in on my recipe…but I’m really bad at measurements!!!  I tend to throw things in the blender and just add as I go for the right taste.  I will give approximates and add to your desire with ingredients like garlic, salt, ginger, water to consistency and miso to taste.

Ingredients (approx): 

  • 2 lbs carrots (I used organic baby carrots since it’s what I had!)
  • 1 TB red miso (organic and/or fermented is a must)
  • 2 TB white miso (same as above!)
  • 3-4 cups water OR some veggie broth, no sodium (the miso will compensate!)
  • 3 TB Ginger Juice or fresh grated ginger
  • 3 garlic cloves
  • 1 TB sesame seeds (optional)
  • 1 TB onion powder (optional)
  • Extra optional add-ins: shiitake mushrooms, tofu, brown rice, green onions, sesame oil, dashi, and if you like some spice a dash of cayenne pepper.

Directions: 

  1. Steam the carrots until they have just a slight crispness left to them, about 15 minutes.
  2. Starting with the water, place all ingredients into a high performance blender (I used a Vitamix).  Start on a low speed and gradually work up.  If you have a Vitamix, no need to go higher than setting 8 on the regular setting.  You may need to stop the machine to stir the ingredients or add a little water if it gets stuck!
  3. Add or garnish with extra optional add-ins, warm if necessary, and ENJOY!!!

CARROT GINGER SOUP IN MASON JAR

*Store up to 5 days in a glass container in the refrigerator*

Anti-Inflammatory Ginger Juice

Dear Leah Renee, 

I have been on the verge of getting sick and need something to kick it!  Help! ~Allison, NY

There are so many powerful herbs and spices to help fight a cold.  One of the very best ways to help you kick that bug (and prevent it next time) is with fresh ginger root.  People have been using this common household item for thousands of years for a good reason. It contains medicinal properties which aids the immune system and warms you up inside.  Because of that, it’s a fantastic cold remedy and has a wide range of other uses for any day of the year.

ginger root to use

Here are some ways ginger aids the body:

  • Gastrointestinal relief.  Ginger is effective at relieving gas and soothe the digestive tract.  motion sickness, morning sickness, and more!
  • Anti-inflammatory. Ginger contains compounds called gingerols (that makes sense!) which can help those who suffer from arthritis.  We hear a lot these days about inflammation and the wreak it has on our body, so incorporating ginger in your diet will help combat it!
  • Joint pain reliever. Due to its anti-inflammatory properties ginger can help relieve joint pain in the body.
  • It tastes really good.  Yummy = Happy = Healthy 🙂
  • Immune booster. Ginger is naturally warming and can promote perspiration when ingested in larger amounts.  If you are fighting a fever, this can help you sweat it out!  You may need to use a little bit more than usual to heighten the effect.
  • Stimulates circulation.  Many people suffer from poor circulation.  Due to the warming effect of ginger it aids in amping up circulation and gets the blood flowing.
  • Metabolic function.   Who doesn’t like this one?!  Get it going (without even hopping on the treadmill!).  Like the last bullet point says, it gets the blood flowing and revs up your internal fire.  Woo!
  • Powerful anti-nausea. Ginger can help relieve symptoms of nausea for those suffering from motion sickness, post operative queasiness, and women suffering from morning sickness, and stomach flu cramps.

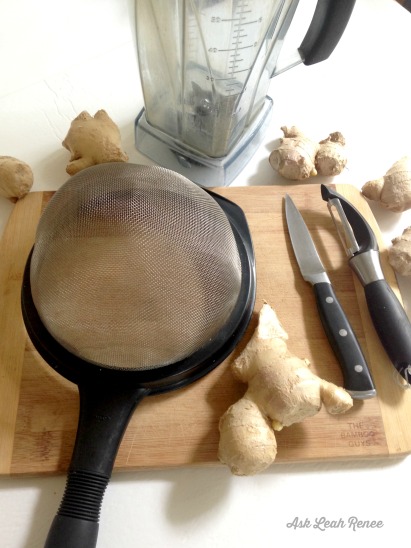
I find the best and tastiest way to add ginger to drinks (like ones to boost immunity) and meals is to make ginger juice.  Preparing ginger juice is easy and it keeps it in a mason jar in the fridge for weeks and weeks.  This makes it simple and easy to grab for when you need it.  I like it even more because at the health food store it’s pricey, so making it at home is that much more satisfying!  Please note: this drink is super concentrated so depending on the recipe/strength desired, you will only need 1 to 3 tablespoons at a time.Tools for ginger juice to use

Here’s what you need: 

  • Ginger Root
  • Filtered Water
  • Knife
  • Blender
  • Vegetable Peeler
  • Cutting board
  • Mesh Strainer
  • Mason Jar (or another glass jar with air free lid)

ginger making process

Directions: 

  • Rinse off the ginger root under cold water.
  • Using your veggie peeler, peel the skin off the ginger (and discard).
  • Chop the ginger into pieces.
  • Add ginger pieces to blender.
  • Pour in filtered water until half of the ginger is covered. Blend.  If using a Vitamix, keep it on setting 5 (after starting at 1) and blend for about 40 seconds.  If you use a higher setting it spits the ginger all over the blender and it wastes a lot of it.
  • Using a mesh strainer and a bowl or large cup underneath, gently pour some of the mixture into the strainer and press down so all the ginger juice is extracted from the ginger fibers.  You could also use a cheese cloth for this process.
  • Get messy!  Using your (clean) fingers, press down on the rind to squeeze more juice into the bowl.  You’d be surprised how much more you get when you do this!!!  It’s like a sponge.
  • Poor into a mason jar or a re-used glass jar.

pouring ginger juice to use


ginger juice pic to use

There are endless ways to use ginger juice, but here are a few of my faves:

  • Health & Immunity Tonic: add 3 TBS ginger juice, the juice of one lemon, a couple dashes of turmeric, a pinch of cayenne pepper, & 1 TB manuka honey in warm water (not boiling as it destroys the beneficial nutrients).
  • Ginger Tea: 3 TBS ginger juice, warm water (or over ice), sweetener of choice (I use raw honey).
  • Carrot, Ginger, Miso Soup: recipe found here.
  • Chai Tea: Chai tea (loose leaf or bag), warm water, 2 TBS ginger juice, sweetener or choice, 1/4 cup almond milk (any milk will do, I like the unsweetened vanilla).
  • Digestive Tonic: Apple Cider Vinegar, ginger juice, squeeze of lemon, water, sweetener of choice.
  • Curb a Sweet Tooth: Try one of my favorite inflammation fighting, anti-oxidant packed drinks here.  You’ll love it and feel better for it!
  • Add to stir-fry’s and other recipes that may call for ginger.

What’s your favorite way to use ginger?